
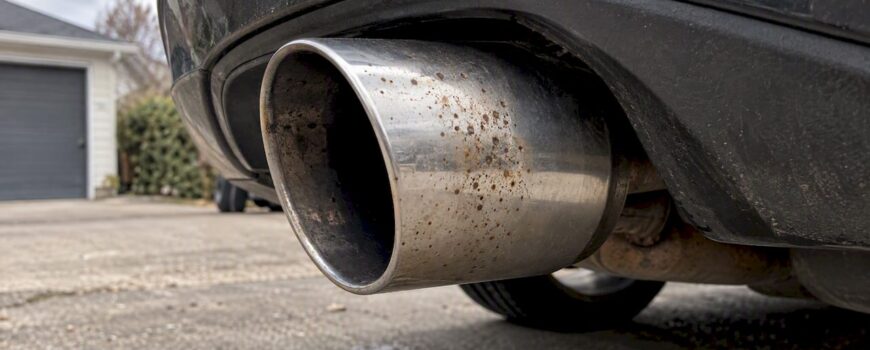
If your stainless exhaust has orange freckles, brown welds or a blue-gold haze, the fix depends on one question: is the damage on the surface or in the metal? Surface staining and heat tint usually clean up with mild soap, a fine non-abrasive pad and a stainless-safe polish. Pitting, pinholes and rotted seams do not polish out, and on a valved or high-performance system they are a reason to replace the part, not to keep scrubbing.
This guide walks through how to tell the difference, how to clean a tip or tailpipe without making things worse, why the rust returns, and when to stop and order new hardware.
TL;DR
- Most orange or brown spots on stainless are surface contamination or heat tint, not structural rust. Wash, then clean gently with a stainless-dedicated pad along the grain, then polish.
- Never use steel wool, a brush that has touched carbon steel, bleach or chloride cleaners. They can leave free iron or chlorides behind and the rust comes back faster.
- WD-40 is a polishing aid at best. It does not repair stainless steel’s protective layer or fix pitting.
- Pinholes, cracked welds, soft seams or corrosion at a valve body, flange or flex section mean replacement, not cosmetic repair.
- Rinse the cooled exhaust after winter and coastal driving. Salt is what keeps this problem alive.
Table of Contents
- Why stainless steel rusts at all
- Triage: cosmetic or structural?
- How to clean light rust and discoloration
- What about WD-40 and baking soda?
- When heat tint is more than cosmetic
- When cleaning will not fix it: replace the part
- Keeping the rust from coming back
- Our perspective
- Replacing a corroded part
- FAQ
- Sources
Why stainless steel rusts at all
Stainless steel resists corrosion because of a thin chromium oxide layer on its surface. Exhausts are one of the harshest places to ask that layer to survive. Extreme heat, water and salt together can defeat the natural protective layer and lead to pitting corrosion, according to a cleaning guide aimed at motorcycle riders that applies equally to car exhausts.
In the northern US, the salt is the main culprit. Winter road treatments leave chloride residue on the undercarriage, and the exhaust heats up and cools down every drive, baking that residue in. Coastal cars see the same thing year-round.
Three separate things tend to get called “rust” on a stainless exhaust:
- Surface iron contamination. Tiny particles of ordinary steel land on the pipe (from road grit, brake dust, a shop’s grinding wheel, or a tool used earlier on carbon steel) and rust. The stainless underneath is fine. This looks like orange freckles and is the easiest to fix.
- Heat tint. Straw, gold, blue or brown discoloration near welds, bends and the hottest sections. It is an oxide film formed by heat. Often cosmetic, but not always (more on that below).
- Real corrosion. Pits, rough patches, weeping seams and pinholes. Metal has been lost, and no polish brings it back.
Triage: cosmetic or structural?
Do this before you reach for any product. Let the exhaust cool completely, and ideally put the car on ramps or stands rated for it.
- Wipe it clean first. A layer of soot and road film hides what is underneath.
- Look at the weld beads and seams. Brown streaking along a weld is a warning sign worth taking seriously.
- Press gently with a blunt tool or a gloved thumb. Metal should feel solid. Flaking, soft spots or a crunchy texture is corrosion that has gone through the surface.
- Check for soot tracks. Black streaks trailing from a joint or seam show exhaust gas escaping, which means a leak that cleaning will not solve.
- Inspect clamps, hangers and flanges. Loose fasteners and vibration damage matter as much as the pipe itself.
A useful rule: a brown or blue surface can often be cleaned, but polishing cannot restore metal lost to pits, pinholes, cracked welds or a perforated seam. If it passes the triage, clean it. If it fails, skip to the replacement section.
How to clean light rust and discoloration
This method suits tips, tailpipes and exposed sections that are cool, structurally sound and only lightly stained. It follows the same logic as Fuel Moto’s published guide to removing bluing and discoloration: light pressure, a small test area and several gentle passes.
What you need
- Mild car soap and water, plus clean microfiber towels
- A fine abrasive pad (a red or gray nylon pad is common) or a stainless brush that has never touched carbon steel
- A stainless-compatible metal polish or a mild rubbing compound
- Gloves and eye protection
- Optional: a dedicated iron remover for orange contamination, used per its label
Steps
- Cool and wash. Wash the exhaust with mild soap and water, then dry it. Grease and soot make abrasives skid and leave swirls.
- Test a hidden spot. Pick an area out of sight, such as the underside of a tip, and try your pad and polish there first. If the finish dulls or scratches, stop and go finer.
- Work along the grain. Stainless tubing has a faint directional finish. Rub with it, never across it, using light pressure. Repeat several light passes instead of one hard one.
- Treat stubborn orange spots. A dedicated iron remover with light agitation can lift embedded iron particles. Keep it off paint, rubber and anything the label does not allow, and rinse thoroughly.
- Polish. Apply a compatible metal polish with a clean towel and buff until the residue is gone.
- Rinse and dry fully. Leftover compound, cleaner or abrasive dust left in contact with the metal is how problems restart.
The goal is restraint. Professional-looking results come from careful surface prep and a small test patch, not from the strongest chemical or a coarse wheel.
Tools and products to avoid
| Avoid | Why |
|---|---|
| Steel wool or a used wire brush | Carbon-steel brushes, steel wool and abrasive discs can deposit free iron, which then rusts and looks like the stainless is failing |
| Bleach and chloride-based cleaners | Chlorides attack the protective layer, the opposite of what you want |
| Household acids | Can leave a bright but vulnerable surface, and are hard to rinse out of seams |
| Coarse abrasive wheels | Leave deep scratches that trap moisture and salt |
| Cleaning a hot exhaust | Chemicals flash dry, stain and can burn skin |
What about WD-40 and baking soda?
Both show up constantly in forum threads, so here is the honest version.
WD-40. Some riders use very fine steel wool with a lubricant as a polishing method, as Bike EXIF describes. The lubricant helps the abrasive glide. That is different from removing rust. A spray does not rebuild stainless steel’s passive layer and cannot repair a pit. If you use it as a polishing aid, clean the surface afterward and finish with a purpose-made stainless polish.
Baking soda paste. It is a mild abrasive and fine for lightly stained chrome-like tips. It will not do much for embedded iron or discoloration from heat, and it has to be rinsed off completely.
The reason a quick “rust remover” is often incomplete is that controlled stainless restoration is a sequence: remove contaminants, rinse thoroughly, dry, and let the passive film recover. Skip a step and you get a surface that is temporarily bright but still vulnerable.

When heat tint is more than cosmetic
On a tuned or custom exhaust, the blue and brown rainbow around welds is not always just looks. Laboratory work on 304 stainless found that heat tint can reduce resistance to pitting in chloride environments, because the oxide layer and the chromium-depleted metal beneath it are weaker barriers than clean stainless.
Practically, that means:
- Light straw-colored tint on a tip far from welds: clean it for looks and move on.
- Heavy dark tint at welds, particularly on a car that sees salt: have a fabricator or exhaust shop look at it. Mechanical cleaning may be enough, or the welds may need professional pickling and passivation.
- Do not try to fix significant weld discoloration with household acid. It is the wrong tool and can leave residue in the joint.
The NASA specifications referenced here describe industrial passivation, not a driveway procedure. Treat them as proof that the process matters, and let a shop with the right chemistry and rinsing capability do it.
When cleaning will not fix it: replace the part
Some corrosion is past the point of repair, and trying to patch it just delays a leak or a failed inspection. Lean toward replacement when the damage involves:
- A valve body or actuator housing, where corrosion can bind the flap or foul the control
- A muffler seam that is weeping, flaking or soft
- A downpipe or the area around the catalytic converter
- A flange or flex section that is cracking or leaking
- Any pinhole, perforation or crack that shows soot tracking
On a performance or luxury car, a leak ahead of the catalytic converters or oxygen sensors can also throw off readings and trigger fault codes, so a leaking joint is not just a noise issue. If the exhaust is a valved system, ask whether the fault is the pipe or the valve and its wiring before replacing anything.
What to confirm before ordering
Getting the replacement right matters as much as the diagnosis. Confirm:
- Exact model, year and engine
- Emissions configuration (for example, whether the car has a particulate filter, which changes the downpipe)
- Pipe diameter and routing
- Valve-control interface and how the controller connects
Our guide to why exhaust fitment differs by model explains why two cars that look alike can need different parts, and this walkthrough of exhaust system anatomy helps you name the section you are dealing with. Because emissions equipment is involved on U.S. cars, read our EPA exhaust tampering checklist before swapping any part that sits near a catalytic converter.
Keeping the rust from coming back
Rust returns for predictable reasons: salt or chloride residue left on the metal, free iron deposited by tools, or heat-tinted welds that were never treated. Yoshimura’s guidance and shop advice line up on the habits that help.
A simple routine
- Rinse the underside regularly. Spraying off the bottom of the car, especially the exhaust, is one of the easiest ways to prevent undercarriage corrosion, and it matters most after winter driving.
- Let it cool first. Cold water on a hot exhaust is hard on the metal and on you. Wait until it is cool to the touch.
- Wash more often in winter. Removing road salt and grime helps slow corrosion, and regular washing is a habit shops recommend across the board.
- Polish the visible stainless. A light coat of stainless polish a few times a year, more often in salty regions, helps keep the surface clean.
- Keep contamination off. Use dedicated stainless tools, and ask any shop that welds or grinds near your exhaust to protect it.
- Retighten and inspect. Vibration loosens clamps and hangers, which lets joints flex and crack.
For the paint and body side of the same problem, this explanation of what actually works against road salt in winter is a useful companion, since the same salt that spots your tips is working on everything else under the car.
Our perspective

We see the same pattern with enthusiast cars. An owner notices orange spotting on a tip, attacks it with whatever is in the garage, and ends up with a scratched, contaminated surface that rusts faster than before. The better habit is boring: wash, gentle abrasion with the right pad, polish, rinse, and then actually look at the welds, valve and flanges.
Valved exhausts add one more reason to be careful. The moving parts and their wiring live in a hot, wet, salty environment, so corrosion at a valve or its seals deserves attention earlier than rust on a tip. If you drive a car you love in a salt state, treat exhaust rinsing the way you would treat washing the wheels. And when a part has gone past cleaning, replace it with the correct fitment instead of stacking temporary patches. A wrong-spec part costs more in the end than the right one the first time.
— Info
Replacing a corroded part
If your triage ended in replacement, we sell exhaust parts, downpipes and accessories for Audi, BMW, Porsche, Mercedes-AMG, Ferrari, Lamborghini and other European and performance cars, including systems with remote electronic valve control. Check fitment against your exact model and emissions setup first, and if you are weighing a valved system against stock, our guide to OEM versus aftermarket exhaust performance lays out the trade-offs.
FAQ
Will rust come back on stainless steel?
It can. It returns where salt or chloride residue stays on the metal, where tools left free iron behind, or where heat-tinted welds were never properly treated. Rinsing the cooled exhaust after winter or coastal driving and using stainless-only tools cuts the odds a lot. For contaminated or heavily welded stainless, a fabricator can clean and passivate it.
Will WD-40 remove rust from stainless steel?
Not as a rust remover. It works as a lubricant when paired with a very fine abrasive, but it does not restore the protective layer or repair pitting. Clean the surface afterward and finish with a stainless polish, or have a shop passivate persistent corrosion.
Will a stainless steel exhaust rust?
Yes, in the sense that it can stain, discolor and pit, especially with road salt and repeated heat cycles. Most of what owners see is surface contamination or heat tint. True structural rot is slower and usually starts at welds, seams, flanges and flex sections.
How do I clean and restore a stainless exhaust?
Let it cool, wash with mild soap, test a hidden area, then use a stainless-dedicated fine pad along the grain with light pressure. Polish with a compatible metal polish, then rinse and dry completely. If you find pits, pinholes or cracked welds while cleaning, stop and plan a repair or replacement.
Sources
- Cleaning Bluing & Discoloration from Stainless Steel Exhausts, Fuel Moto
- NASA passivation specification PRC-5010
- Role of heat tint on pitting corrosion of 304 austenitic stainless steel in chloride environment, OSTI
- How to clean modern motorcycle exhausts, Bennetts BikeSocial
- How to Clean and Polish Motorcycle Exhaust Pipes, Bike EXIF
- 5 Ways to Prevent Rust in the Exhaust System, V&F Auto
- Why Is Rust a Major Threat to Your Car’s Exhaust System?, Kamphaus Auto Care