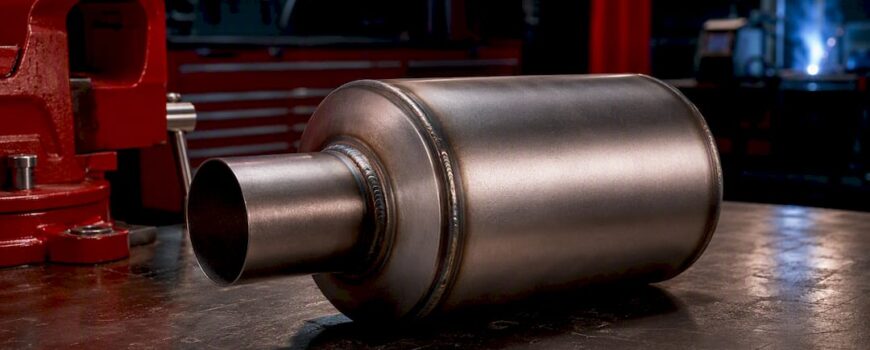
A correctly tuned Helmholtz resonator cancels a narrow exhaust drone frequency, typically in the 70 to 130 Hz range, while leaving the rest of your exhaust note untouched. It works best when you have one dominant droning frequency and limited space for a bulky muffler. It will not fix multiple broadband peaks or a drone so low it would need a cavity too big to fit under your car.
TL;DR:
- Helmholtz resonators are most effective for canceling a narrow drone frequency between 70 and 130 Hz, especially in constrained space.
- Larger cavity volumes are required to target lower frequencies, making tuning more challenging at those ranges.
- Precise measurement and airtight fabrication are critical to ensure the resonator functions correctly and maintains tuning over time.
- Placing the resonator mid-pipe, downstream of the catalytic converter, improves durability and maintains consistent tuning.
- Fixed resonators only address one frequency, so shifting drone or multiple problematic tones may necessitate multiple or valved systems for better results.
Table of Contents
- What a Helmholtz Resonator Exhaust Setup Actually Does
- Tuning and the Helmholtz Design Equation (Calculator-Ready)
- Practical DIY Design and Build Checklist
- Installation, Placement, and Durability Considerations
- Helmholtz vs. Quarter-Wave Resonators: Decision Checklist
- Troubleshooting: Why Your Resonator Didn’t Work
- When a Valved, Controllable Exhaust Beats a Fixed Resonator
- Effects on Exhaust Flow and Backpressure
- Integrating a Resonator Into an Aftermarket Exhaust System
- Real-World Applications: Where Helmholtz Resonators Earn Their Keep
- What Actually Matters When You Build One of These
- Get a Professional Fix When Fixed Tuning Isn’t Enough
- Sources
What a Helmholtz Resonator Exhaust Setup Actually Does
Picture a glass soda bottle. Blow across the top and you get one clear pitch, not a hiss. That’s a Helmholtz resonator in its simplest form: a sealed cavity acting as a spring of trapped air, connected to a short neck acting as a mass of air that oscillates in and out. At the resonant frequency, that oscillating air column absorbs energy from the sound wave passing by and cancels it out.
That’s the core difference between a Helmholtz resonator exhaust and a standard muffler packed with fiberglass or steel wool. A muffler absorbs a wide swath of frequencies indiscriminately, which is why heavily packed mufflers can make an exhaust sound flat and lifeless. A Helmholtz design is surgical. It targets one narrow band and leaves everything else alone, which is exactly why enthusiasts chasing drone without killing their exhaust tone gravitate toward it.
For automotive drone specifically:
- The typical target band sits between 70 and 130 Hz, which lines up with the resonant frequencies most cabins amplify at highway cruise RPM.
- Cavity volumes for this application are chosen according to the target frequency, with larger volumes needed for lower frequencies.
- Lower target frequencies need bigger cavities. There’s no way around that relationship.
Tuning and the Helmholtz Design Equation (Calculator-Ready)
The math behind a Helmholtz resonator exhaust build isn’t intimidating once you see it laid out. The governing equation is:
f = c / (2π) × √(A / (V × L_eff))
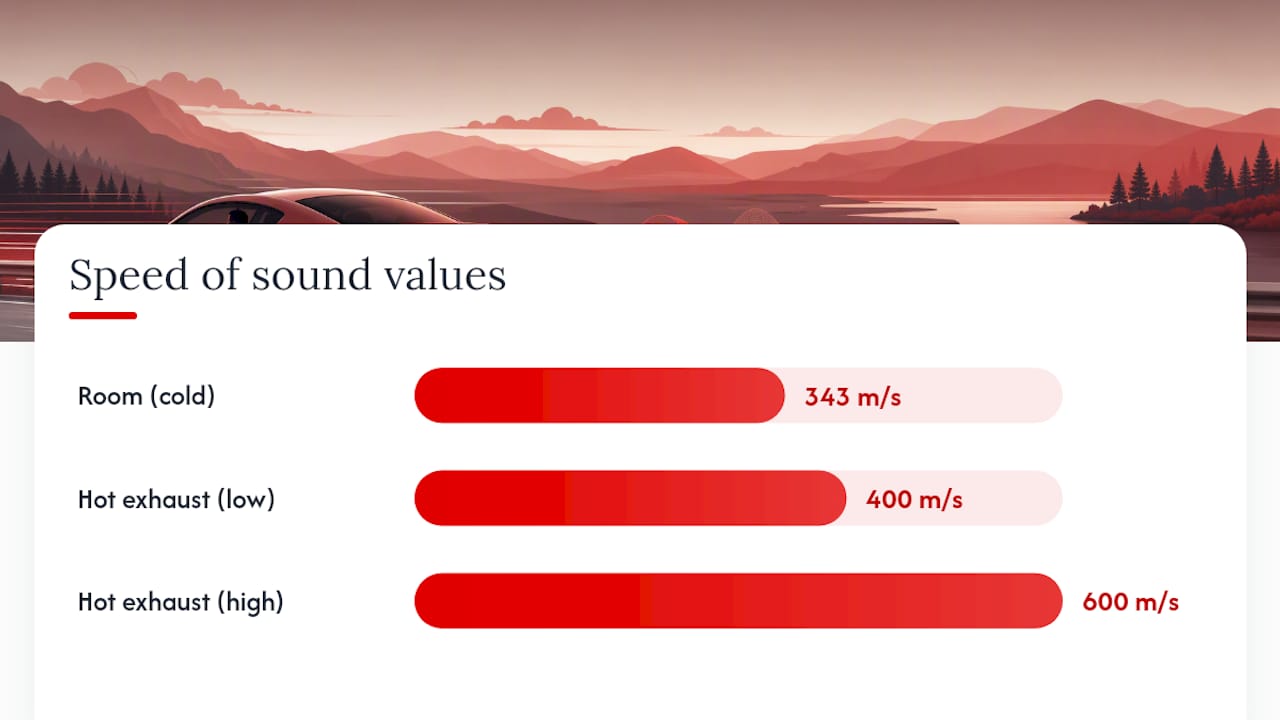
Where f is resonant frequency in Hz, c is the speed of sound in air (about 343 m/s at room temperature, faster when the exhaust gas is hot), A is the neck’s cross-sectional area in m², V is cavity volume in m³, and L_eff is the effective neck length in meters.
That last term, L_eff, is where most first-time builders get tripped up. The physical neck length isn’t the whole story. Air doesn’t stop moving cleanly at the neck’s opening. It drags a bit of the surrounding air with it, effectively lengthening the neck. The standard end-correction approximation adds roughly 0.85 times the neck diameter to each open end.
Here’s a worked example for a 100 Hz target, the kind of number a Helmholtz resonator calculator will spit back almost instantly:
| Parameter | Metric | Imperial |
|---|---|---|
| Target frequency | A typical tuning frequency | Similar value |
| Cavity volume | A practical chamber size for this target | Similar order |
| Neck diameter | A moderate neck diameter typical of builds | Similar scale |
| Neck length (physical) | A common length chosen for tuning | Corresponding imperial measure |
| Speed of sound (hot exhaust) | Elevated above room temperature value to account for exhaust heat | Corresponding imperial speed |
Pro Tip: Run your numbers twice, once with cold speed of sound (343 m/s) and once with hot exhaust gas temperature (often 400 to 600 m/s depending on load). Your resonator will always tune sharper at operating temperature than it measures on the bench.
Practical DIY Design and Build Checklist
Building a Helmholtz resonator exhaust chamber is straightforward metal fabrication, but the sequence matters. Skip a step and you’ll spend a weekend chasing a rattle that was never in the design.
- Measure the actual drone frequency. Use a phone-based spectrum analyzer app with the mic positioned at ear height in the driver’s seat. Log RPM against the frequency where drone peaks, usually during steady highway cruise, not wide-open throttle.
- Calculate cavity and neck dimensions using the equation above, plugging in your measured frequency and accounting for end correction.
- Pick your cavity shape and material. Cylindrical canisters are easiest to fabricate and mount. 409 stainless steel resists exhaust corrosion at a reasonable cost; 304 stainless lasts longer but costs more and welds slightly differently. Wall thickness of at least 1.5mm resists flex under vibration.
- Plan the neck connection. A welded neck holds tune permanently; a slip-fit clamped neck lets you experiment before committing. Either way, the joint needs to be airtight. A loose slip joint leaks acoustic energy and detunes the whole assembly.
- Fabricate in sequence: cut the cavity shell, weld the end caps, drill and weld the neck stub, then pressure-test the sealed cavity with low-pressure air and soapy water to catch pinhole leaks before it ever sees exhaust gas.
- Mount and tune on-vehicle. Weld or clamp into position, drive your usual cruise route, and re-measure. If the drone frequency shifted from your bench calculation (it usually does once things get hot), trim the neck length slightly to correct it.
Pro Tip: Don’t weld the neck permanently until after your first on-vehicle test drive. A slip-fit joint you can adjust by a centimeter saves you from re-fabricating the whole canister over a small tuning miss.
Installation, Placement, and Durability Considerations
Where you weld a Helmholtz resonator into the exhaust run matters almost as much as how you size it. Placement too close to the header exposes the cavity to extreme heat cycling and turbulent, unsteady flow that can shift the effective tuning. Most successful builds place the resonator mid-pipe, downstream of the catalytic converter, where flow has settled and temperatures are more consistent.
A few rules keep the build durable and on-frequency for the long haul:
- Use rigid brackets rather than rubber-isolated hangers directly on the resonator body. Flex in the cavity walls changes its effective volume and drifts the tuning over time.
- Weld quality matters more here than almost anywhere else on the exhaust. A pinhole leak in the cavity wall bleeds acoustic pressure and quietly kills the effect without any obvious symptom.
- Stick with stainless for anything mounted near the underbody’s road spray and salt exposure. Mild steel canisters rust through in a season or two in wet climates.
- Thermal cycling loosens poorly executed welds faster than steady heat does, so a resonator that sees stop-and-go traffic needs tougher joints than one that only sees sustained highway heat.
Helmholtz vs. Quarter-Wave Resonators: Decision Checklist
Quarter-wave, or J-pipe, resonators are the other classic tool for killing drone, and the choice between the two comes down to bandwidth, space, and how precisely you can hit your target frequency.
- Bandwidth: A Helmholtz resonator is narrowband by design, ideal for one dominant drone frequency. A quarter-wave tube can address a broader range depending on its length, but with less surgical precision at any single point.
- Packaging: This is where Helmholtz wins outright. Because tuning depends on the volume and neck geometry rather than physical pipe length, an HR achieves the same low-frequency target in far less longitudinal space than a quarter-wave tube requires, which matters enormously in tight underbody layouts on lowered cars or vehicles with limited ground clearance.
- Tuning sensitivity: J-pipes are simpler to build (just a capped branch pipe of the right length) but more sensitive to small length errors. Helmholtz designs give you more variables (cavity volume, neck diameter, neck length) to fine-tune independently.
If your car has one stubborn drone frequency and no room to spare, a Helmholtz resonator exhaust chamber is the better bet. If you have generous space and a broader hum to tame, a quarter-wave pipe can be the simpler build.
Troubleshooting: Why Your Resonator Didn’t Work
Built it, welded it, drove it, and the drone is still there? Work through this sequence before assuming the design failed.
- Check for leaks first. A pinhole weld leak or a loose slip-fit neck is the single most common reason a Helmholtz resonator underperforms. Pressure-test the cavity again, and inspect every weld seam visually for pinholes or discoloration that suggests porosity.
- Check for panel flex. Press on the cavity walls while the engine idles near the drone RPM. Any perceptible flex changes the effective volume and shifts your tuning off target.
- Re-measure under real conditions. Drone often shifts under load versus a flat cruise. Log frequency across a few different throttle positions and road grades, not just one steady-state pull.
- If you find multiple peaks, one resonator won’t cut it. Research on vehicular silencers confirms that a single Helmholtz resonator is inherently narrowband, so covering two or three drone frequencies usually means building two or three differently sized resonators rather than one oversized compromise.
- Consider a valved system if your drone shifts with driving mode. A fixed resonator tuned for highway cruise can’t adapt if your drone frequency moves under different loads or gear ratios.
When a Valved, Controllable Exhaust Beats a Fixed Resonator
A welded Helmholtz resonator is a static solution. It’s tuned once for one frequency, and it stays that way whether you’re cruising at 2,000 RPM or towing a trailer at 3,200 RPM. That’s the tradeoff nobody mentions in the DIY forums: fix one drone peak and you might expose a second one at a different RPM range, or find your carefully tuned cavity goes slightly off once you swap tires or change gearing.
This is where a valved exhaust setup earns its keep. Instead of one static tune, an electronically controlled valve system adjusts flow path and back pressure in real time, addressing shifting drone characteristics across driving modes rather than locking in one fixed compromise.
Valvecontrolexhaust builds these systems for exactly this scenario:
- Remote, driver-adjustable valve control lets you open up for aggressive driving and close down for a quiet commute, addressing drone across multiple RPM ranges instead of just one.
- Professional NVH tuning accounts for the whole vehicle’s acoustic behavior, not just a single measured peak.
- Compatibility spans luxury and performance platforms including Audi, BMW, Porsche, Mercedes-AMG, Ferrari, and Lamborghini, where a welded-in fixed resonator would be a permanent, irreversible modification.
If you’d rather understand the broader resonator landscape before deciding, this breakdown of resonator roles in exhaust systems covers the fundamentals in more depth.
Effects on Exhaust Flow and Backpressure
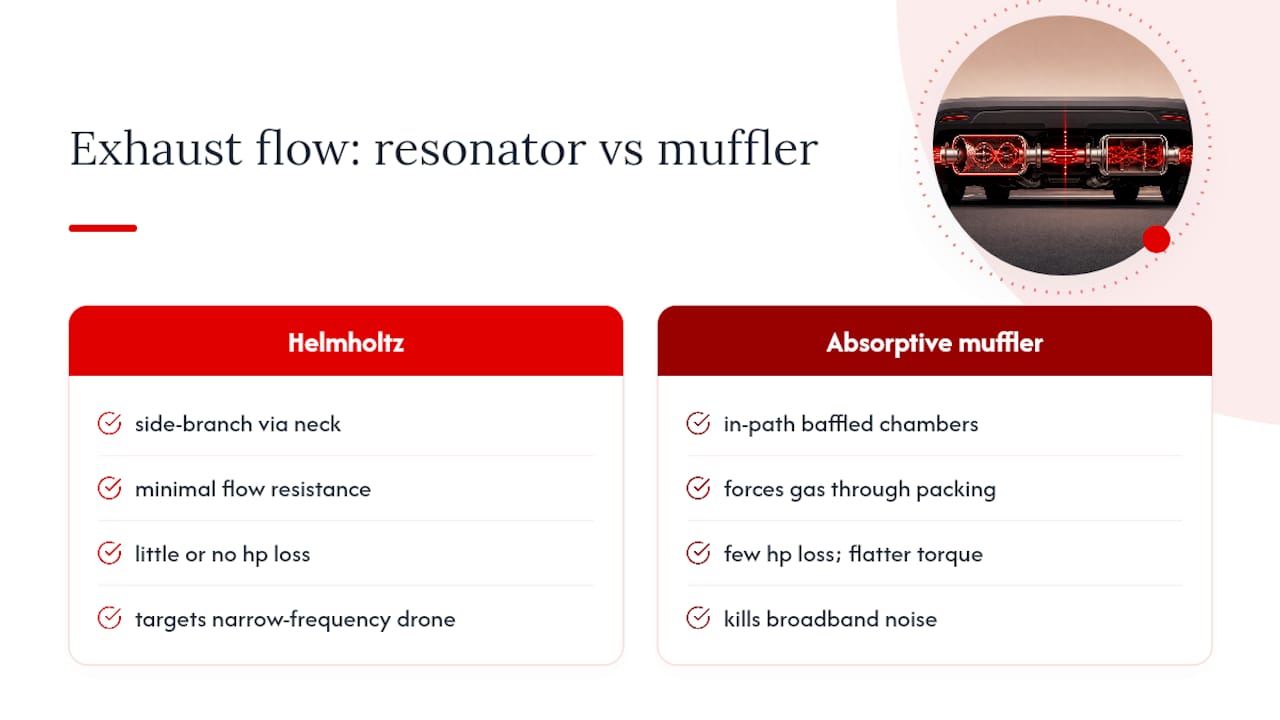
A properly sized Helmholtz resonator has a minimal effect on overall exhaust flow, and that’s actually one of its biggest selling points over an absorptive muffler. The main exhaust pipe runs straight through; the resonator cavity sits as a side branch connected through the neck. Exhaust gas doesn’t have to pass through the cavity itself, it just flows past the neck opening, so the resistance added to the primary flow path is small compared to a baffled muffler that forces gas through folded internal chambers.
That said, “minimal” isn’t “zero.” The neck opening does create a small pressure fluctuation at the resonant frequency, and if the neck diameter is undersized relative to the main pipe, you can introduce a slight flow restriction at certain RPM ranges. This is why sizing the neck correctly, not just for acoustic tuning but for flow area relative to your main exhaust diameter, matters for anyone chasing both sound quality and power.
Compare that to what happens when you oversize an absorptive muffler’s packing density to kill drone: you often trade a few horsepower and a flatter torque curve for a quieter cabin. A well-designed Helmholtz resonator sidesteps that tradeoff almost entirely, because it’s targeting a narrow acoustic problem rather than physically obstructing the gas path. For anyone building a resonator to add to an existing performance exhaust, this is the reason to keep the main pipe diameter unchanged and treat the resonator strictly as a side-branch acoustic element, not a flow restriction to compensate for elsewhere.
Integrating a Resonator Into an Aftermarket Exhaust System
Adding a Helmholtz resonator to an existing aftermarket exhaust setup is usually a retrofit exercise, and where it gets welded in depends heavily on what’s already downstream. If you’ve already installed a cat-back or axle-back system with minimal internal baffling (common on performance-oriented setups built for maximum flow), you likely have exactly the drone problem a resonator solves, because those systems are frequently tuned for aggressive tone at the expense of highway cruise refinement.
The integration itself is mechanically simple: cut into the mid-pipe section, weld in a T-fitting or branch connection for the resonator neck, and mount the cavity using rigid brackets that don’t rely on the resonator body itself for structural support. The acoustic performance doesn’t change based on brand or system, what matters is where the resonator sits relative to your drone’s source and how well the neck couples to the main pipe.
One practical wrinkle: aftermarket systems with mandrel-bent pipe of a nonstandard diameter (2.5 inch, 3 inch, and other common performance sizes) require you to recalculate neck area relative to that specific pipe diameter, not a generic assumption. A resonator sized for a 2.25 inch stock pipe won’t couple the same way to a 3 inch aftermarket system. If you’re running a hybrid noise-reduction strategy that combines a resonator with some absorptive packing near the tip, a combined reactive and dissipative approach tends to outperform either technique alone, particularly on cars where the aftermarket system already removed most of the factory sound deadening.
Real-World Applications: Where Helmholtz Resonators Earn Their Keep
The clearest real-world case for a Helmholtz resonator exhaust build shows up on cars that swapped a stock exhaust for a straight-piped or minimally baffled aftermarket system and then discovered a maddening drone at exactly highway cruise RPM, the speed you spend the most time at. That’s not a coincidence. Removing factory muffling almost always exposes whatever resonant frequency the cabin and exhaust system were already prone to amplifying, and a targeted resonator is often the cleanest fix without undoing the performance exhaust’s benefits.
Peer-reviewed testing backs up why this approach works beyond forum anecdotes. Recent hybrid muffler research combining dual Helmholtz resonators with dissipative elements measured meaningful sound pressure level reductions under real engine operating conditions, confirming that the reactive cancellation effect isn’t just a bench-test curiosity. It holds up under actual exhaust flow and temperature.
The pattern that shows up again and again in shop builds: a single resonator handles a clean, isolated drone peak beautifully, but cars with more complex exhaust geometry (dual-exit systems, cars with resonated X-pipes, or vehicles that developed a second drone frequency after a gear ratio change) often need two resonators of different volumes rather than one larger compromise design. That’s less a limitation of the physics and more a reminder that real exhaust systems rarely have just one problem frequency to solve.
What Actually Matters When You Build One of These
Most guides treat Helmholtz resonator design like a pure math problem: solve the equation, cut the metal, done. That undersells the two things that actually determine whether your build works: accurate frequency measurement before you cut anything, and airtight fabrication after you do.
The equation gets you in the right neighborhood. End correction and hot-exhaust speed-of-sound adjustments get you closer. But a single pinhole weld or a slip-fit joint that isn’t quite tight enough will quietly erase all of that precision, and most people troubleshoot everything except the leak first. Start there.
The conventional advice to “just build one big resonator” for stubborn drone also deserves pushback. If your car has more than one problem frequency, which is common on cars that have already been modified once, you’re better served by two smaller, purpose-built resonators than one oversized cavity trying to do double duty. It’s a build philosophy borrowed from mixed-diameter industrial silencer design, and it works just as well under a car.
Where fixed resonators genuinely run out of road is variable driving conditions. A resonator tuned perfectly for 2,200 RPM highway cruise can’t follow you into a lower gear on a mountain grade. That’s not a fabrication failure. It’s a physical limitation of a fixed-volume cavity, and it’s the honest reason a valved, adjustable exhaust exists as a category at all.
— Info
Get a Professional Fix When Fixed Tuning Isn’t Enough
If you’ve read this far and realized your drone shifts across driving modes, changes with load, or shows up at more than one RPM range, welding in a static resonator is a compromise, not a cure. Valvecontrolexhaust builds valved exhaust systems that adjust in real time instead of locking you into one tuned frequency forever.

That real-time control is the practical difference: instead of guessing at a single drone frequency and hoping your driving stays consistent, a valve-controlled system lets you dial in a quiet commute and open up for a back road, without cutting a single pipe twice. Valvecontrolexhaust’s systems cover Audi, BMW, Porsche, Mercedes-AMG, Ferrari, and Lamborghini platforms, with remote electronic control over both sound character and flow. For a deeper look at how the components fit together on your specific platform, start with the exhaust system anatomy breakdown and see whether a valved setup solves what a fixed resonator can’t.
Sources
- Helmholtz resonance (John W. D. Walker / UNSW)
- Hybrid noise control and resonator packaging (PMC article)
- Numerical and experimental analysis of flow–acoustic interaction in a hybrid muffler incorporating dual Helmholtz resonators (EPJ Plus, 2026)
- Acoustical performance of Helmholtz resonators used as vehicular silencers (FME Transaction, 2018)