
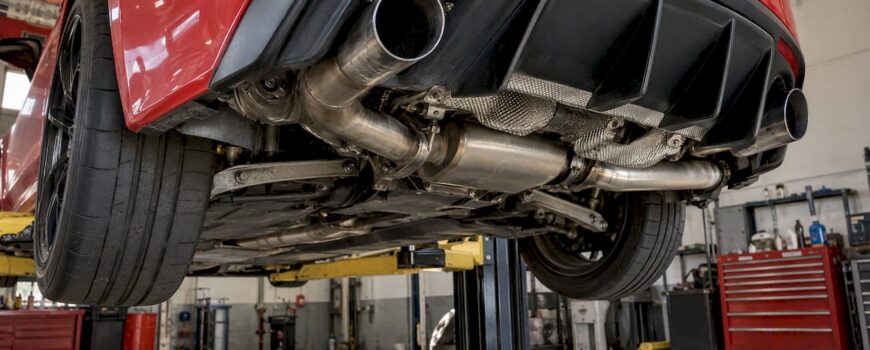
A rear diffuser sits a few inches from the hottest part of your exhaust outlet. Heat shielding keeps that heat off the diffuser, the bumper cover and the wiring and lines around them. It works through three things: correct tip clearance, a diffuser material that tolerates the temperature, and a reflective shield with an air gap where radiant heat is still reaching a panel. This guide covers the car diffuser, not the grill heat diffusers that share the search term. Alignment comes first, because a shield cannot rescue a tip that points at plastic. That is why we start with the exhaust and tip position whenever someone calls us about a melted or discolored diffuser.
TL;DR
- Exhaust heat is high enough to damage resin, clear coat, adhesives and plastic. Exhaust temperatures can exceed 1,000°F, so a diffuser edge near the tips needs planned protection.
- Fix tip position and clearance first, then add shielding. Our guide to stopping rear bumper melt with exhaust alignment starts from a 1/2 inch gap.
- A shield works best when it is built from heat-rated metal or insulated layers and mounted with an air gap, not pressed flat against the panel.
- Inspect cold after the first drives, then again after repeated heat cycles. Discoloration, a resin smell or warping means stop using the car until it is checked.
Table of Contents
- What a heat shield actually does
- When a rear diffuser needs shielding
- Fix clearance before you add a shield
- Materials that hold up near exhaust outlets
- Downpipes and cats: where the real heat lives
- How to install and inspect shielding, step by step
- Common mistakes
- Promo: parts that start from the right fit
- Our perspective
- FAQ
- Sources
What a heat shield actually does
A heat shield does not cool the exhaust. It absorbs or reflects heat and sends it somewhere harmless. According to a repair shop’s explanation of exhaust heat shields, the shield is a metal or composite layer under the vehicle that redirects exhaust heat away from fuel lines, wiring and the floorboard. Heat that is not redirected can reach adjacent parts and, over time, damage brake lines and electrical components or start a fire.
Two kinds of heat matter on a diffuser:
- Radiant heat travels in straight lines from a hot pipe, tip or muffler to any surface that can “see” it. A reflective shield works well against it.
- Convective heat is hot exhaust gas and hot air washing over a surface. This is what hits a diffuser edge right behind the tips at idle and under load.
Your diffuser sees both. That is why tip distance, tip angle and airflow matter as much as the shield itself.
When a rear diffuser needs shielding
Not every diffuser needs a dedicated shield. It becomes a question in these situations:
- You swap the stock diffuser for a different one. A different shape can move panel edges closer to the outlets, or remove the factory shield or reflector that came with the original.
- You change the exhaust. New tips, a larger outlet diameter, a different muffler or a valved system can shift where the hot parts sit.
- You change ride height or wheel setup. Altered geometry changes the tip-to-panel gap.
- You see warning signs. Yellowing, a dull or cracked clear coat, a smell of overheated resin or a panel that has started to warp near the tips.
The diffuser material is the starting point. On a carbon diffuser, a Lux Carbon-style engineering guide notes that the resin, clear coat and adhesives reach their limits before the fibers do. That is a general point about composite construction: the weakest layer sets the limit. ABS plastic and budget fiberglass resins are even less forgiving. The same principle applies to a painted plastic bumper cover.
Fix clearance before you add a shield
A shield is the second line of defense. The first is a correct gap between the hot tip and the panel.
Our own rule of thumb comes from the case that brings in the most melted bumpers: exhaust alignment first, with a 1/2 inch gap. Check it like this:
- Measure with the car cold, parked on level ground, tips in their normal resting position.
- Check all around the tip, not only at the closest point. A tip that is centered at the top of the cutout may sit close at the bottom.
- Remember that exhausts move. Pipes expand when hot and the engine rocks under load, so a gap that looks fine cold can close up when everything is at temperature.
- Look at hangers and rubber mounts. A stretched or cracked mount lets the system sag toward the bumper.
If you cannot get a comfortable gap by aligning the system, then look at shielding, a different tip length or a diffuser designed with proper cutouts.
Materials that hold up near exhaust outlets
Shields are usually aluminum or stainless steel plates mounted either around the heat source or around the part being protected. Which one you choose depends on how hot the spot gets and how much room you have.
The table below gives the practical differences.
| Approach | Where it fits | What to know |
|---|---|---|
| Aluminum shield plate | Underbody areas, panels with moderate radiant heat | Light and reflective. Lower temperature ceiling than stainless. |
| Stainless steel shield | Spots right behind tips, downpipe and turbo areas | Higher temperature tolerance, holds shape when hot. |
| Layered shield with insulation core | Tight spaces, curved surfaces | Flexible, but it needs the right mounting hardware and an air gap. |
| Heat-rated diffuser material | The diffuser itself | A material and finish chosen for the temperature removes part of the problem. |
Two details separate a good shield from a hot patch:
- Air gap. Air is a good insulator, so a shield that sits slightly off the surface works better than one pressed flat against it.
- Mounting. The shield itself must tolerate the temperature, and its hardware must not trap moisture or rub through the surface it protects.
For reference on how seriously the factory treats this, Ford’s body builder guidance requires components within 4 in (101.6 mm) of the exhaust, without Ford-provided shields, to withstand 700°F, or 900°F close to the catalyst, in normal operation. The Ford General Body Builder Layout Book also says shields should extend far enough beyond the exhaust parts to protect surfaces from heat radiated at any angle, with banding as the preferred attachment. A diffuser edge a few inches from a tip falls inside that zone.
Downpipes and cats: where the real heat lives
The tips are not the hottest point. Catalytic converters commonly run between 900°F and 1,600°F, so upstream parts need protection too. On high-output cars the downpipe sits close to the floor, wiring and the chassis. Some of our downpipes ship with an integrated heat protector. Examples include the IPE SS Cat Downpipe with Heat Protector for the McLaren 720S and 765LT and the FI Exhaust Heat Protector for the Lamborghini Aventador LP700-4 downpipe. If your chassis is one of these, the shielding conversation starts at the downpipe, not at the diffuser.

How to install and inspect shielding, step by step
This routine works for a new diffuser, a new exhaust or a shield retrofit.
1. Let everything cool
Exhaust parts cause serious burns long after the engine is off. Work on a cold car, jacked and supported with proper stands.
2. Dry-fit before you drill or glue
Offer the diffuser up without fastening it. Check that the gap around each tip is consistent, and that nothing contacts the tips, reflectors or parking sensors. A diffuser can match the bumper perfectly and still put an edge too close to the tips.
Where it goes wrong: fitting for looks and skipping the clearance check, then finding the damage after the first spirited drive.

3. Set the exhaust position
Adjust hangers and tip position so the gap is even and meets the 1/2 inch minimum above. Do this before any shield goes on, so you shield the real heat path rather than a temporary one.
4. Choose where the shield goes
You can mount it on the hot side (around the pipe or tip) or on the protected side (behind the panel edge). Hot-side mounting keeps heat out of the area entirely. Panel-side mounting is simpler when you cannot reach the exhaust.
5. Mount with spacers and the right hardware
Use heat-rated fasteners, spacers or standoffs that keep an air gap and avoid contact with the panel. Ford’s guidance prefers banding for attachment, with welding acceptable only where it does not weaken structure or create leaks. Avoid screws that bite into a laminate or adhesives rated below the temperature.
6. Make the first drives short
Take a short drive, park, and let it cool. Then look at the panel edge near the tips. A short first drive tells you about the fit before heat soak has a chance to do damage.
7. Re-inspect after heat cycles
Exhaust systems expand when warm, and clamp-on tips can loosen after repeated heating. After a few hundred miles, recheck the gaps, clamps and shield hardware cold.
Stop using the car and have it inspected if you smell overheated resin, see the panel warp or lose finish near the tips, or notice discoloration that grows between checks. Discoloration at the edge is a sign of an unsuitable gap, a missing shield or the wrong surface finish.
Common mistakes
- Treating the shield as a fix for bad alignment. A shield reduces heat reaching a panel. It does not make a tip that touches plastic safe.
- Pressing the shield flat to the panel. This removes the air gap that does much of the insulating.
- Using foil tape or loose wrap as the whole solution. Adhesives and thin foils have temperature ceilings. A shield that fails or peels can be worse than none.
- Restricting airflow. Ford’s layout guidance notes that restricting air movement under the vehicle raises underbody temperatures. A diffuser with a closed-off cavity can trap heat unless the design lets air through.
- Only checking when the car is cold. Cold fit is the starting point. The test that matters is after a heat cycle.
Promo: parts that start from the right fit
If you are replacing the exhaust or downpipe behind a diffuser, it helps to buy parts that fit the chassis the first time. We sell valved exhaust systems, downpipes, mufflers, tips and accessories for Audi, BMW, Porsche, Ferrari, Lamborghini, Mercedes-AMG and other European performance cars, and we sell genuine products direct from authorized manufacturers. Browse exhaust parts, downpipes and accessories by make and model.

If your muffler is the part that needs replacing, we list Eisenmann rear mufflers for specific chassis, such as the BMW M3 E92 and E93 and the BMW E90 and E91 330i. For how all the pieces connect, our exhaust system anatomy guide shows where each part sits relative to the bumper.
Our perspective
We see heat damage as a design problem, not a shield problem. When the exhaust is right for the car, tips sit centered in their cutouts, the gap is even and the diffuser is built for the heat, you rarely need more than a well-placed shield.
Our approach is to start from fitment. We carry parts made for specific chassis from authorized manufacturers, so the pipes, mufflers and tips are designed for the position they occupy. That is also why we link to the downpipes with integrated heat protectors for cars where the heat load is highest.
Valved systems add a useful angle. A system that lets you control sound and flow with a remote controller gives you a way to tune the driving experience without changing what sits behind the bumper. Our guides on how exhaust valves toggle automatically and on decibel management cover that side.
Check the gap cold, drive, check again hot-cycled and cold. If you do that, the diffuser stays the way you bought it.
Info
FAQ
Do I need a heat shield behind a rear diffuser?
It depends on how close the diffuser edge sits to the tips and what the diffuser is made of. If the gap is at least 1/2 inch all around and the material is rated for the heat, you may not need one. If you see discoloration, a resin smell or warping, add shielding or move the exhaust.
What can I use as a heat shield?
Shields are typically made of aluminum or stainless steel, sometimes with an insulating layer. Choose the material for the temperature of the spot, and mount it with an air gap and heat-rated hardware.
How hot does the exhaust get near a diffuser?
Exhaust temperatures can exceed 1,000°F at the hot end, and tips near the diffuser are cooler but still hot enough to damage resin, paint and adhesives. Heat builds with spirited driving, so check after a hard run.
How do I check my diffuser after installing it?
Measure the gap cold, take a short drive, park and let the car cool, then look for discoloration or warping near the tips. Repeat after some hundred miles of heat cycles, and recheck clamps and hardware.
Sources
- Understanding exhaust heat shields
- Ford General Body Builder Layout Book
- Carbon Fiber Near Exhaust Heat guide