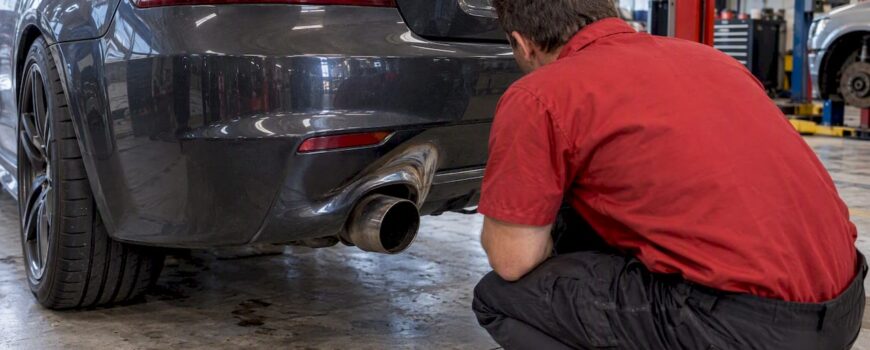
Yes, under the right conditions a hot exhaust tip or pipe can melt or deform a plastic rear bumper, and it happens more often than most drivers expect. If you see active melting, smoke, or a burning smell, stop driving and let the car cool fully before you get close to the tailpipe. Once it’s safe, check the gap between the tip and the bumper opening and look for soot, warped plastic, or a loose hanger.
TL;DR:
- A bumper melting issue is almost always caused by a shifted or loose exhaust system, not a manufacturing defect in the plastic.
- Tight clearance under half an inch between the tip and bumper, combined with a tilted pipe or broken hanger, significantly increases melting risk.
- Correcting mechanical causes involves inspecting and replacing hangers, re-bending pipes, or installing downward-angled tips to improve clearance.
- Using heat shields, rigid metal barriers, or installing proper mounting brackets can prevent damage during temporary or ongoing fixes.
- Persistent heat problems from engine or exhaust issues require diagnosing engine misfires or clogged converters before cosmetic repairs.
Table of Contents
- 1. Quick Inspection Checklist and Immediate Actions
- 2. Common Causes That Concentrate Exhaust Heat on a Bumper
- 3. How to Fix Alignment and Mechanical Causes
- 4. Thermal Protection Options and Their Pros and Cons
- 5. When Melting Signals a Deeper Engine or Exhaust Problem
- 6. Repair and Replacement Options for Melted Bumpers
- 7. How Proper Aftermarket Parts and Fitment Reduce Risk
- 8. Author Perspective: Prioritized Field Approach
- Parts and Guidance for Getting Exhaust Fitment Right
- FAQ
- Sources
1. Quick Inspection Checklist and Immediate Actions
Before you touch anything mechanical, confirm what you’re dealing with. A five-minute visual check tells you whether this is a minor clearance issue or something that needs a shop right away.
- Look for melted or bubbled plastic, discoloration, or black soot on the bumper’s inside surface near the tip.
- Measure or eyeball the gap between the exhaust tip and the bumper opening; anything tighter than about half an inch is worth a closer look.
- Check whether the tailpipe sits level or has tilted up toward the bumper, a sign of a failed or stretched hanger.
- Inspect rubber hangers for cracks, tears, or complete separation from the mount.
- Sniff for exhaust leaks near joints or clamps, since a leak can redirect hot gas toward plastic that was never meant to see it.
If the damage is minor and you need to drive before a permanent fix is possible, an adhesive-backed heat barrier like Thermo-Tec can buy time as a stopgap, but it’s not a substitute for fixing the alignment. Avoid long highway runs or track driving until the clearance problem is resolved.
2. Common Causes That Concentrate Exhaust Heat on a Bumper
Bumper melting almost always traces back to a mechanical shift in the exhaust system rather than a flaw in the plastic itself. Forum repair threads describing melted bumper sections consistently point to the same handful of root causes.
A broken or loose exhaust hanger is the most common culprit. Once a hanger fails, the muffler or tailpipe tilts upward or sideways, closing the gap to the bumper opening and aiming hot gas directly at plastic that was designed to sit a safe distance away.
Aftermarket or oversized exhaust tips are another frequent cause. A tip that’s wider, longer, or positioned differently than the factory part can eat into clearance that was fine with the original setup.
A bent or shifted tailpipe, often from curb strikes, parking lot impacts, or a rushed installation, can point exhaust flow at an angle the bumper was never designed to handle. High-output conditions add to the risk: a clogged catalytic converter, a misfire, or sustained high-load driving like track days can all push exhaust temperatures well above normal, turning a borderline clearance situation into a melted one. Rear diffusers and tight bumper cutouts can also trap or redirect hot gases instead of letting them disperse.

3. How to Fix Alignment and Mechanical Causes
Fixing the cause, not just the symptom, is what keeps the problem from coming back. Most of these steps start with the hangers and work back toward the tip.
- Inspect every rubber hanger and mount along the exhaust system and replace any that are cracked, stretched, or torn.
- Check whether the muffler or tailpipe has tilted due to a failed hanger, since even one bad mount can throw off the whole pipe’s angle.
- Have a muffler shop dry-fit a downward-angled stub or re-bend the existing pipe, then test clearance before welding anything permanent.
- Consider a longer or downturned tip if the factory design puts the exhaust exit too close to the bumper opening.
- Re-check clearance after a highway run, since pipes can shift slightly under heat and vibration.
Shops commonly solve this by cutting a short length of pipe and installing an angled stub so the tip sits slightly lower than the bumper opening, which is enough to restore safe clearance according to repair reports from muffler shop forums. Clamping is fine for a temporary test fit, but welding is the better long-term choice once the position is confirmed correct, since clamps can loosen under heat cycling.
Pro Tip: Dry-fit any new pipe section with clamps first, drive it under real load, and only weld once you’re sure the angle is right.

DIY work is reasonable for hanger replacement and basic inspection, but cutting, bending, or welding exhaust pipe calls for a shop with the right tools. Guessing at pipe angles risks a repeat trip back to the same problem.
4. Thermal Protection Options and Their Pros and Cons
Shielding doesn’t fix a misaligned pipe, but it adds a real margin of safety, especially while you’re waiting on a permanent repair or driving a setup where clearance is naturally tight.
- Adhesive-backed heat barriers like Thermo-Tec are inexpensive and easy to apply, but work best as a short-term or low-heat mitigation rather than a permanent fix, since the adhesive can fail over repeated heat cycles.
- Rigid stainless-steel shields in 304 or 321 grade hold up far longer and reflect radiant heat instead of absorbing it, making them the better choice where metal-to-plastic clearance is already tight.
- Heat blankets and wire-mesh shields that include an air gap outperform flat adhesive tape, since trapped air insulates far better than direct contact with a hot surface.
- Exhaust tip shields, such as the SiriMoto N1 style shield built from stainless steel with reflective tape and rivet mounting, cover the tip itself and are designed specifically to stop soot buildup and melting at the bumper cutout.
Thermo-Tec’s THE-13500 adhesive barrier is rated to withstand very high radiant temperatures, which explains why it shows up so often in community repair threads as a go-to stopgap even though it’s not meant to replace a mechanical fix. For anything permanent, a rigid shield with mechanical fasteners beats adhesive tape because fasteners don’t degrade the way glue does under constant heat.
5. When Melting Signals a Deeper Engine or Exhaust Problem
Not every case is a simple clearance issue. Some signs mean the heat problem is coming from how the engine or exhaust system is running, not just where the pipe is pointed.
Persistent burning smells, repeated melting after a fix, OBD-II misfire codes, or unusually high catalytic converter temperatures all point to something beyond alignment. A shop can run an exhaust leak check, inspect clamps and welds, test catalytic converter backpressure, and pull OBD-II codes to rule out a misfire or clogged converter. Our engine response exhaust checklist walks through the kind of diagnostic checks that catch these issues early. If a misfire or clogged cat is the actual root cause, heat shielding alone only delays the next melt. Ignition timing problems can also raise exhaust gas temperatures, and a primer on spark advance and ignition timing explains how tuning choices factor into exhaust heat output.
6. Repair and Replacement Options for Melted Bumpers
Once the cause is fixed, the cosmetic damage is usually straightforward to address, and the repair path depends on how bad the melting is.
Minor surface melting can often be sanded down, filled with plastic repair compound, reshaped, and repainted, with results that look close to original on small spots. Severe deformation, where the plastic has warped or lost structural shape, usually calls for replacing the bumper cover or diffuser outright, since reshaping heavily warped plastic rarely holds up over time. Repair costs and timelines vary widely by shop and vehicle, so it’s worth getting a quote before committing either way. The one rule that matters most: fix the mechanical cause before you spend money on cosmetic repair, otherwise you’re paying to repeat the same damage.
7. How Proper Aftermarket Parts and Fitment Reduce Risk
Matching tailpipe geometry and tip length to your bumper’s cutout is the single biggest fitment factor in preventing heat damage. A tip that’s too wide or sits too far back eats into clearance fast, a mistake we cover in detail in our guide to common exhaust upgrade mistakes.
Valve-controlled exhaust systems add another variable worth understanding: adjustable valves change exhaust flow and backpressure in real time, which can shift tip temperature under high-load conditions. Choosing tips, downpipes, and heat shields designed for your specific bumper cutout matters more than chasing a particular look. Accessory brackets and shields, like the Akrapovic heat shield and bracket setups built for actuator mounting, show how OEM-style hardware handles this kind of fitment. A diagnostic-first approach, paired with professional installation for any welding or permanent shield work, catches clearance problems before they become melted plastic.
8. Author Perspective: Prioritized Field Approach
Inspect first, fix alignment second, add durable shielding if needed, and treat cosmetic repair as the last step, not the first. Skipping straight to filler and paint just hides a problem that’s likely to resurface. Make a habit of glancing at tip clearance during routine maintenance and always after a rear-end bump or exhaust work.
— Info
Parts and Guidance for Getting Exhaust Fitment Right
Fixing a clearance problem for good often means swapping a tip, pipe section, or shield rather than patching the same spot twice. Our Exhaust Parts category covers tips and tailpipe hardware sized for proper bumper clearance, our Down Pipe selection covers routing components worth checking when heat is concentrating somewhere it shouldn’t, and our Accessories range includes shields and brackets for the kind of permanent fix this article walks through.

- Browse exhaust tips and tailpipe sections built with bumper clearance in mind.
- Check downpipe routing options if heat is concentrating near a cutout.
- Pick up heat shields and mounting brackets for a lasting, not cosmetic, fix.
We sell genuine parts direct from authorized manufacturers across a wide range of European and luxury performance vehicles, and any permanent modification should be paired with a shop fitment check before you call the job done. Start with our Exhaust Parts category to find tips and hardware sized for your bumper opening.
FAQ
Will exhaust melt a zip tie?
Yes, a zip tie near hot exhaust components can soften, melt, or fail completely, since most plastic zip ties aren’t rated for sustained exhaust temperatures. If you need to secure something near the exhaust, use a metal clamp or a heat-rated tie instead.
How do you get melted plastic off an exhaust pipe?
Let the exhaust cool completely, then scrape off loosened plastic with a plastic or wood scraper to avoid scratching the metal. Stubborn residue often comes off with a wire brush or a degreaser made for automotive use, applied after the pipe is fully cool.
Why does my exhaust smoke smell burnt?
A burnt smell from exhaust smoke often means plastic, rubber, or another material is in direct contact with a hot exhaust surface, which matches patterns seen in forum reports of bumper melting. It can also point to an exhaust leak forcing hot gas against nearby components, so a visual inspection for melted plastic or soot is the first step.
What is the black plastic under my bumper?
The black plastic under a rear bumper is usually a splash shield, diffuser, or structural bumper support, all of which sit close enough to the exhaust to be at risk if clearance is tight. If it looks warped, discolored, or sooty, treat it as a sign to check tailpipe alignment right away.
Sources
- URGENT! Muffler tip is melting bumper! – North American Motoring
- Exhaust melted small section of rear bumper | JKOwners Forum
- Hot exhaust melted the bumper – Car Talk Community